How to Install a Ball Screw Nut: Assembly Guide Without Dropping Balls
📑 Table of contents (Click to open)
Linear motion systems, at the heart of industrial automation, are critical components that determine the precision and efficiency of modern manufacturing processes. Among the most fundamental and common elements of these systems, the ball screw nut, also known as a ball nut, plays an indispensable role in many applications such as CNC machines, robotic arms, precision measuring devices, and automatic assembly lines, by converting rotary motion into linear motion with high efficiency. The correct and error-free installation of the ball screw nut is vital for the system’s lifespan, performance, and reliability. Completing the installation process without dropping balls is a critical step to maintain the integrity of such sensitive mechanisms and prevent costly failures. This detailed field guide and technical article will comprehensively cover the intricacies, technical requirements, and strategies for preventing ball loss during ball screw nut installation for engineers, technicians, and maintenance specialists working in the industrial automation sector. Our aim is to provide practical information by explaining the assembly process step-by-step, minimizing potential risks, and ensuring optimal system performance.
Working Principle and Technical Data of Ball Screw Nut Installation
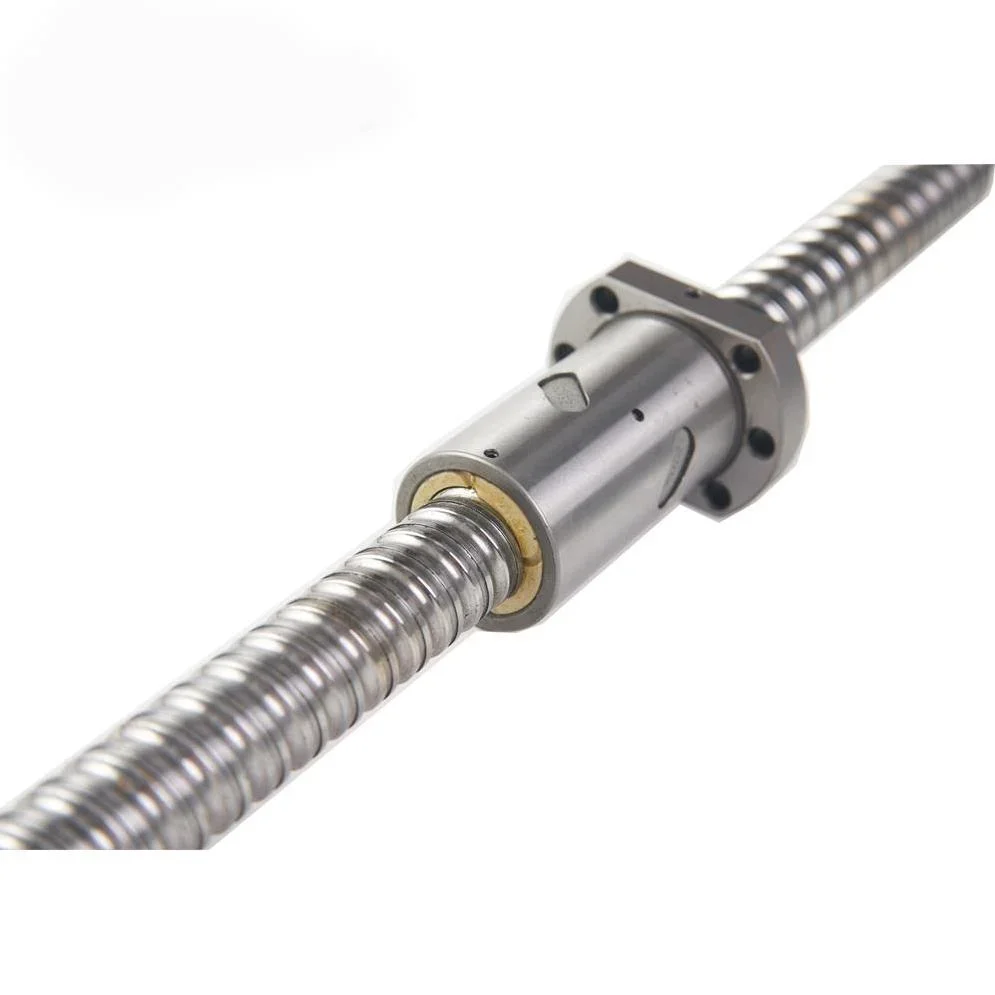
Ball screw nuts, as their name suggests, are mechanical elements that convert rotary motion into linear motion by minimizing friction between the screw shaft threads and the nut through internal steel balls. These balls continuously circulate in special channels within the nut. As the screw shaft rotates, the balls roll along the helical path inside the nut and return to their starting point via a recirculation mechanism (typically a ball return tube). This continuous cycle provides much lower friction, thus higher mechanical efficiency (up to 90%), and less heat generation compared to traditional sliding lead screws. High efficiency means that the same load can be carried with smaller motors, or higher loads can be moved with the same motor. Ball screw nuts offer high precision, excellent repeatability, low backlash, and high rigidity. These features make them ideal for applications requiring micron-level positioning accuracy. In terms of engineering data, the performance of a ball screw nut is defined by parameters such as dynamic load capacity (Ca), static load capacity (Coa), pitch, nominal diameter, ball diameter, and accuracy class (e.g., C0, C1, C3, C5, C7). The accuracy class directly affects the system’s positioning accuracy and repeatability. For example, C0 and C1 classes are used for ultra-precision applications, while C5 and C7 may be sufficient for general industrial applications. Areas of use cover a wide range, including machine tools (lathes, milling machines, machining centers), semiconductor manufacturing equipment, medical devices, aerospace applications, and general automation systems. The continuous and accurate operation of these systems depends on the application of correct installation techniques.
| Parameter | Value/Description |
|---|---|
| Nominal Diameter (d) | Outer diameter of the ball screw (e.g., 16mm, 20mm, 25mm) |
| Pitch (p) | Distance the nut travels when the screw completes one full rotation (e.g., 5mm, 10mm) |
| Dynamic Load Capacity (Ca) | Maximum axial load it can carry with 90% reliability over 1 million revolutions (kN) |
| Static Load Capacity (Coa) | Maximum axial load it can carry without permanent deformation (kN) |
| Accuracy Class | Level of positioning accuracy and repeatability (e.g., C0, C3, C5, C7) |
| Ball Diameter | Diameter of the balls inside the nut (e.g., 2.381mm, 3.175mm) |
| Backlash | Amount of play that occurs during direction change (µm or mm) |
| Material | Typically alloy steel (e.g., SAE 52100 or equivalent) |
Key Considerations for Ball Screw Nut Installation in the Field
- Preparation Phase and Workspace Cleanliness: Before starting the installation, ensure that the work area is absolutely clean. Ball screw nuts and shafts are extremely sensitive to even the smallest dust particles or metal chips. Such foreign matter can impede ball movement, accelerate wear, and lead to premature failures. The shaft and nut to be installed should be carefully cleaned with a lint-free cloth and an appropriate cleaner (e.g., isopropyl alcohol), then allowed to dry. All necessary tools (torque wrench, socket sets, lubricant, protective gloves, etc.) should be prepared in advance and easily accessible.
- Use of Protective Sleeve/Mandrel (Preventing Ball Loss): The most critical installation step for ball screw nuts is preventing the balls from falling out. New nuts typically come with a plastic sleeve (mandrel) or assembly tool that holds the balls in place and replaces the screw shaft that will pass through the nut during installation. This sleeve prevents the balls from scattering when separating the nut from the shaft or installing it onto the shaft. During installation, as the nut is brought closer to the shaft, the sleeve should be slowly pushed by the shaft, and the shaft should take the place of the sleeve as the nut slides onto it. Never pull the sleeve suddenly or completely remove the nut from the sleeve, otherwise, the balls will immediately scatter. In some cases, a special assembly tool or guide shaft provided by the manufacturer is used. These tools ensure that the balls remain securely in their raceways.
- Proper Lubrication and Initial Operation: Proper lubrication of the ball screw and nut before and after assembly is fundamental for system efficiency and lifespan. The type and amount of grease or oil specified by the manufacturer should be used. Typically, a thin layer of lubricant is applied to the inside of the nut and the threads of the shaft. Lubrication reduces friction, prevents wear, and provides corrosion protection. Before initial operation, the system should be manually moved back and forth several times throughout its entire range of motion to ensure the lubricant is evenly distributed across all ball raceways.
- Alignment of Shaft and Bearings: Before the nut is mounted, ensure that the ball screw shaft and its supporting bearings are perfectly aligned. Misalignment can lead to excessive stress on the shaft, premature wear on the nut and balls, increased friction, and noise. The parallelism and concentricity of the shaft should be checked using laser alignment devices or precision measuring tools. Bearing blocks and motor connections should be secured with the correct torque values and using a cross-tightening method.
- Torquing of Mounting Bolts and Tightening Sequence: The bolts that mount the ball screw nut should be tightened according to the manufacturer’s specified torque values and typically with a cross-tightening sequence. Overtightening can cause deformation in the nut body or binding of the bearings, while insufficient tightening can lead to looseness and vibration. Use a torque wrench to ensure each bolt reaches the correct torque value. This ensures that the nut seats properly and evenly in its housing.
- Testing and Inspection: After installation is complete, the system must be operated manually or with a low-speed control program throughout its entire range of motion. During this stage, any abnormal noises, binding, excessive vibration, or difficulty in movement should be observed. The amount of backlash can be checked using special measuring devices (e.g., dial indicator) and verified to be within manufacturer tolerances.
Common Problems and Solutions During Ball Screw Nut Installation
Here are some common problems that may be encountered during or after ball screw nut installation and their solutions:
- Ball Loss: This is the most serious and frequently encountered problem. It usually occurs when the nut’s protective sleeve is not used or is accidentally removed.Solution: If ball loss occurs and the number of lost balls is small, they can be carefully refilled with spare balls provided by the manufacturer. However, in most cases, it is difficult to correctly place the balls in the correct sequence and number, so the safest solution is to completely replace the nut with a new one. Always use the protective sleeve or assembly tool to prevent ball loss, and never completely remove the nut from the sleeve.
- Binding or Difficult Movement: Abnormal resistance or sticking when moving the ball screw or nut.Solution: This situation usually results from misalignment, insufficient lubrication, or foreign matter entering the system. First, check the alignment of the shaft and bearings and adjust if necessary. Then, ensure adequate lubrication. If the problem persists, disassemble the system to check for foreign matter or inspect the balls for damage.
- Excessive Backlash: More play than expected between the nut and the shaft, affecting positioning accuracy.Solution: For preloaded nuts, check the preload adjustment and increase it if necessary (according to manufacturer instructions). If the nut is not preloaded or adjusting the preload does not solve the problem, wear may have occurred, and the nut may need to be replaced.
- Noisy Operation: Abnormal sounds (clicking, rubbing, squeaking) when the system is running.Solution: Insufficient lubrication, damaged balls, misalignment, or loose mounting bolts can cause noise. Check the lubrication level and apply fresh lubricant. Check alignment and tighten bolts to the correct torque. If the noise persists, a more detailed inspection may be required to check for damage to the balls or the internal structure of the nut.
- Overheating: Abnormal heating of the ball screw nut or shaft when the system is running.Solution: Excessive preload, insufficient lubrication, or misalignment can lead to overheating. Check the preload adjustment and set it according to manufacturer recommendations. Verify the lubrication level and ensure the lubricant is of the correct type. Address any alignment issues. If heating continues, it should be considered that the balls or bearings may have been damaged due to excessive friction.
Conclusion and Expert Advice for Ball Screw Nut Installation
Ball screw nut installation is a critical operation at the heart of industrial automation systems and must be handled with meticulous care to ensure the system’s long-term, efficient, and precise operation. The steps and considerations detailed in this guide serve as a roadmap for field technicians and engineers. Especially, strategies for preventing ball loss are among the most important stages of the installation process; even the loss of a single ball can render the nut completely dysfunctional and result in a costly failure. Therefore, always making it a habit to use the protective sleeve or special assembly tool provided by the manufacturer should be an indispensable principle for the assembly team. Furthermore, cleanliness before and after assembly, proper lubrication, precise alignment, and adherence to manufacturer-specified torque values are the cornerstones of ensuring optimal system performance. It should be remembered that the installation of sensitive mechanisms like ball screw nuts requires not only technical knowledge but also patience, attention, and the ability to pay close attention to detail. Knowing common problems in advance and being prepared for them minimizes potential downtime and increases production efficiency. In the continuously evolving world of industrial automation, the correct installation and maintenance of such fundamental components will directly affect the reliability and competitiveness of your machines. Always refer to the manufacturer’s installation instructions and seek expert support when necessary; this will be the most accurate and reliable approach. Request a quote on WhatsApp.
FAQ
What is a ball screw nut and why is it important in industrial applications?
A ball screw nut converts rotary motion into linear motion with high efficiency using recirculating steel balls. It is crucial for precision positioning in CNC machines, robotics, and other industrial automation systems.
How can I prevent the balls from falling out during ball screw nut installation?
The most critical step is to prevent ball loss. Always use the protective plastic sleeve or assembly tool provided by the manufacturer. Slowly slide the nut onto the ball screw, allowing the screw to push the sleeve out gradually. Never remove the sleeve suddenly or completely from the nut.
What are the essential steps for a successful ball screw nut installation?
Key steps include ensuring a clean workspace, using the protective sleeve, applying the correct type and amount of lubricant, precisely aligning the ball screw and its bearings, and tightening all mounting bolts to the manufacturer's specified torque values using a cross-tightening sequence.
What are the common problems encountered during ball screw nut installation and how can they be resolved?
Common issues include ball loss, binding or difficult movement (often due to misalignment or insufficient lubrication), excessive backlash (wear or incorrect preload), noisy operation, and overheating (excessive preload, poor lubrication, or misalignment). Each issue has specific troubleshooting steps outlined in the guide.
How do I test and verify the correct installation of a ball screw nut?
After installation, manually move the system through its full range of motion at low speed. Observe for any abnormal noises, binding, excessive vibration, or difficulty in movement. Use precision measuring devices, like a dial indicator, to check for backlash and ensure it is within manufacturer tolerances.