Building Your Own 3D Printer: Essential Electronic and Mechanical Components
📑 Table of contents (Click to open)
- Building Your Own 3D Printer: Essential Electronic and Mechanical Components – Introduction and Technical A...
- Building Your Own 3D Printer: Essential Electronic and Mechanical Components – Operating Principle and Tech...
- Building Your Own 3D Printer: Essential Electronic and Mechanical Components – Mechanical Systems
- Building Your Own 3D Printer: Essential Electronic and Mechanical Components – Electronic Systems
- Building Your Own 3D Printer: Essential Electronic and Mechanical Components – Field Considerations
- Building Your Own 3D Printer: Essential Electronic and Mechanical Components – Common Problems and Solutions
- Building Your Own 3D Printer: Essential Electronic and Mechanical Components – Conclusion and Expert Advice
- FAQ
Building Your Own 3D Printer: Essential Electronic and Mechanical Components – Industrial Automation Field Guide
body { font-family: Arial, sans-serif; line-height: 1.6; color: #333; margin: 20px; }h1, h2, h3, h4, h5 { color: #2c3e50; margin-top: 25px; margin-bottom: 10px; }p { margin-bottom: 10px; text-align: justify; }ul { list-style-type: disc; margin-left: 20px; margin-bottom: 10px; }li { margin-bottom: 5px; }table { width: 100%; border-collapse: collapse; margin: 20px 0; }th, td { border: 1px solid #ddd; padding: 10px; text-align: left; }thead th { background-color: #f8f9fa; color: #333; }strong { color: #0056b3; }
Building Your Own 3D Printer: Essential Electronic and Mechanical Components – Introduction and Technical Analysis
In the world of industrial automation, accelerating production processes, developing customized solutions, and ensuring cost-effectiveness are critically important. In this context, additive manufacturing technologies, especially 3D printers, offer strategic advantages across a wide range of applications, from prototyping to final part production, jig and fixture manufacturing, and spare parts supply. Building your own 3D printer provides flexibility, customization potential, and a deeper technological understanding beyond standard commercial solutions. This field guide and technical article, aimed at industrial automation professionals, details the essential electronic and mechanical components, their functions, and selection criteria needed when designing and assembling their own 3D printers. Our goal is not just to assemble a device, but to provide the necessary knowledge infrastructure to create a reliable, high-performance automation tool that can be integrated into your production line and optimized for your specific needs. This process requires an integrated application of engineering principles, material science, and control systems knowledge.
Building Your Own 3D Printer: Essential Electronic and Mechanical Components – Operating Principle and Technical Data
The process of building your own 3D printer begins with the selection of an additive manufacturing technology. For industrial automation applications, one of the most common and accessible options is Fused Deposition Modeling (FDM) or Fused Filament Fabrication (FFF) technology. FDM printers operate on the principle of heating and melting a thermoplastic filament, then depositing it layer by layer to create an object. At the core of this process lies precise motion control and material handling.
Building Your Own 3D Printer: Essential Electronic and Mechanical Components – Mechanical Systems
The mechanical skeleton of a 3D printer forms the foundation for precise motion and repeatability.
- Chassis (Frame): This is the structure that supports all components of the printer and provides stability. For industrial applications, aluminum extrusion profiles (e.g., 2020, 2040, 4040) or steel frames should be preferred. These profiles offer high rigidity and minimize vibrations, thereby improving print quality. Different kinematic configurations such as CoreXY, Cartesian, or Delta directly impact chassis design. CoreXY and Cartesian systems are more common, while Delta printers are generally faster but require more complex calibration.
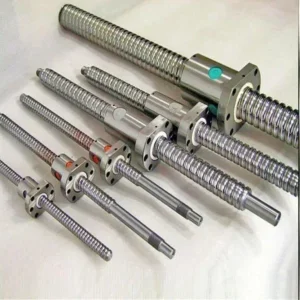
- Linear Motion Systems: These systems provide the X, Y, and Z-axis movement for the extruder and print bed. In industrial-grade printers, linear guide rails (MGN series) and blocks offer significantly higher precision, durability, and load-bearing capacity compared to V-slot wheel systems. These systems ensure consistent movement with minimal backlash. Lead screws (with anti-backlash nuts) are used for precise movement in the Z-axis, while timing belts and pulleys are common for X and Y axes. Anti-backlash nuts for lead screws are critical for increasing Z-axis precision.
- Heated Bed: This is a heated platform that ensures proper material adhesion during printing and prevents warping. It typically consists of a glass, PEI (Polyetherimide), or magnetic flexible plate mounted on an aluminum base. For industrial applications with large print volumes, powerful and homogeneously heated AC silicone heater pads or PID-controlled DC heated plates are preferred. Thermal stability is essential for the smooth printing of large parts.
- Extruder: Responsible for pushing the filament into the hotend. Direct Drive extruders offer better retraction control due to the motor being directly on the hotend and are ideal for flexible filaments. Bowden systems, with the motor mounted on the chassis, reduce moving mass and allow for faster prints, but can struggle with flexible filaments. For industrial use, dual-drive extruders that prevent filament slipping and provide high torque should be preferred.
- Hotend: The part where the filament is melted and pushed out through the nozzle. All-metal hotends are necessary for working with high-temperature filaments (e.g., ABS, Nylon, PC) because the PTFE tube does not extend into the hotend, eliminating the risk of degradation at high temperatures. The nozzle material (brass, hardened steel, V6 plated copper) should be selected according to the abrasiveness of the filament to be printed. Steel nozzles are ideal for carbon fiber-reinforced filaments.
Building Your Own 3D Printer: Essential Electronic and Mechanical Components – Electronic Systems
The brain and nervous system of a 3D printer consist of electronic components.
- Control Board (Mainboard): The main electronic component that manages all printer movements, temperatures, and other functions. 32-bit processor boards (e.g., SKR series, DuetWiFi, BTT Octopus) supporting open-source firmware like Marlin or Klipper offer performance and flexibility for industrial applications. These boards can manage complex systems with more stepper motor driver slots, expanded I/O ports, and faster processing capabilities.
- Stepper Motors: Precision motors that provide linear movement in the X, Y, Z axes and push the filament in the extruder. NEMA 17 size motors are the most common. For industrial applications, high-torque and low-heating motors should be preferred. The step angle (e.g., 1.8 degrees) and current ratings of the motors determine the balance between precision and power.
- Stepper Drivers: Integrated circuits that convert signals from the control board into electrical pulses that stepper motors can understand. Drivers such as TMC2208, TMC2209, TMC2130, or TMC5160 offer features like silent operation (stealthChop), microstepping (e.g., 1/256), and sensorless homing, improving print quality and ease of use. SPI-controlled drivers like the TMC5160, in particular, allow current and other parameters to be adjusted via software, providing flexibility in the field.
- Power Supply (PSU): Provides the necessary power to all electronic components of the printer (control board, heated bed, hotend, motors). For industrial use, SMPS (Switch-Mode Power Supply) units with stable and sufficient power output, overcurrent, and short-circuit protection should be preferred. Typically, 12V or 24V systems are used; 24V systems offer the advantage of drawing lower current for the same power, allowing for smaller cable cross-sections and faster heating.
- Thermistors and Heater Cartridges: Used to measure and control the temperature of the hotend and print bed. High-temperature thermistors (e.g., NTC 100K 3950 or thermocouples) are essential for hotends operating at 300°C and above. Heater cartridges bring the hotend to the desired temperature. Reliable and accurate temperature control is critical for maintaining material properties and print success.
- Limit Switches (Endstops): Used to define the home position of each axis. Mechanical, optical, or magnetic (Hall effect) switches can be used. For industrial applications, optical or magnetic switches may be more suitable for repeatability and durability. In systems using sensorless homing, these switches may not be needed.
- Cabling and Connectors: Cables and connectors that link all these electronic components must be of high quality for safe and stable operation. Industrial-standard, heat-resistant cables and robust connectors (e.g., JST, XT60) should be preferred. Cable management is important to prevent moving parts from abrading cables and to reduce EMI/RFI interference.
| Parameter | Value/Description |
|---|---|
| Build Volume | Customizable according to specific needs; commonly from 300x300x300 mm to 500x500x500 mm. |
| Printing Technology | Fused Deposition Modeling (FDM) – Filament diameter: 1.75mm or 2.85mm. |
| Mechanical Structure | Aluminum Extrusion (2040/4040), Linear Rails (MGN12/MGN15), Lead Screws (T8/T10). |
| Control Board | 32-bit ARM Processor (e.g., BTT SKR Pro, Duet 3), Klipper/Marlin Firmware supported. |
| Stepper Motors and Drivers | NEMA 17 High Torque Motors, TMC5160 or TMC2209 SPI controlled drivers. |
| Extruder Type | Direct Drive, Dual-Drive Mechanism. |
| Hotend Type | All-Metal, High Temperature (300°C+), Interchangeable Nozzle System. |
| Power Supply | 24V DC, Minimum 30A (720W), Industrial Type with Overload Protection. |
Building Your Own 3D Printer: Essential Electronic and Mechanical Components – Field Considerations
- Material Compatibility and Storage: Industrial applications often require engineering filaments such as PETG, ABS, Nylon, and Polycarbonate (PC). Printing these materials at correct temperatures and, especially for hygroscopic ones (Nylon, PC), storing them protected from moisture (filament dryers, vacuum bags) is critically important. Moist filament leads to poor layer adhesion, bubbles, and surface defects.
- Calibration and Settings: After mechanical assembly, parameters such as axis movements, steps/mm values, PID settings (for hotend and bed), z-offset, extruder calibration (E-steps), and bed leveling must be meticulously calibrated. These steps form the foundation of print quality and accuracy. Automatic bed leveling sensors (BLTouch, Klicky Probe) provide great convenience, especially for printers with large print areas.
- Environmental Control: Some engineering filaments (ABS, PC) tend to shrink during printing and cooling, which can cause layer separation or cracking. When working with such materials, using an enclosure that provides a stable temperature and controlled airflow around the printer significantly improves performance. Actively heated enclosures are ideal for these materials.
- Safety Precautions: Due to parts operating at high temperatures (hotend, heated bed) and components containing electrical current, safety must be paramount. Quality cabling, appropriate fusing, grounding, thermal runaway protection, and having a fire extinguisher are mandatory. Ensure all electrical connections are professionally made and insulated.
- Software and Firmware Optimization: The firmware (Marlin, Klipper) of the selected control board must be optimized according to the printer’s hardware and usage scenarios. Solutions like Klipper, with a Raspberry Pi-based microcontroller, offer more advanced motion control, input shaping (resonance compensation), and remote management capabilities via a web interface. This provides ease of monitoring and intervention in an industrial environment.
- Periodic Maintenance: Regular maintenance is essential for the printer’s longevity and trouble-free operation. Lubricating linear rails and lead screws, checking belt tensions, nozzle cleaning or replacement, dusting fans, and checking electrical connections for looseness are indispensable parts of maintenance routines.
Building Your Own 3D Printer: Essential Electronic and Mechanical Components – Common Problems and Solutions
Here are some common problems you might encounter when building or using your own 3D printer, along with their solutions from an industrial automation perspective:
- Layer Shifting: This problem typically occurs due to motors skipping steps, loose belts, loosened set screws on pulleys, or excessively fast print speeds. As an industrial solution, control of stepper motor driver currents (overheating or insufficient torque), ensuring correct belt tension, tightening set screws on pulleys, and minimizing mechanical backlash are necessary. High-quality linear motion systems reduce this risk.
- Bed Adhesion Issues: Prints failing to stick to the bed lead to first-layer failure and wasted prints. Solutions include cleaning the print bed (isopropyl alcohol, soapy water), correctly setting bed temperature, precise calibration of first layer height (z-offset), using adhesives (hairspray, glue stick), or trying different surface materials like PEI/glass. At an industrial scale, automatic bed leveling systems and homogeneously heated beds minimize this problem.
- Nozzle Clogging: Occurs when filament melts and solidifies inside the nozzle or foreign particles block it. Solutions include protecting filament from moisture, using correct print temperatures, preferring quality filament, and regular nozzle cleaning or replacement. All-metal hotends eliminate the risk of PTFE tube melting, reducing such clogs. The “cold pull” technique can clear clogs.
- Stringing / Oozing: Fine threads formed when the extruder leaks filament during non-printing movements. Optimizing retraction settings (length and speed), slightly lowering print temperature, and increasing travel speed can be solutions. Direct drive extruders generally offer better retraction control than Bowden systems.
- Layer Separation / Cracking: Occurs particularly with materials like ABS, PC, due to poor layer adhesion or shrinkage during cooling. Solutions include an enclosed and heated print environment (enclosure), optimization of print bed and hotend temperatures, reducing cooling fan power (especially for initial layers), and ensuring filament is dry.
- Surface Imperfections: Aesthetic and functional issues like layer lines, ripples, or rough surfaces. This can be due to mechanical vibrations, loose belts, incorrect stepper motor driver settings, or insufficient cooling. Solutions include checking the tightness of all mechanical connections, using vibration dampeners, increasing microstepping settings of stepper motor drivers, and optimizing print speed. Input shaping in Klipper firmware can help resolve such issues at a hardware level.
Building Your Own 3D Printer: Essential Electronic and Mechanical Components – Conclusion and Expert Advice
As an expert operating in the industrial automation sector, the process of building your own 3D printer represents much more than just assembling a machine. It offers you the opportunity to delve into the depths of additive manufacturing technologies, understanding the function and interaction of each component. This knowledge will enhance your ability to optimize existing production processes, design customized tools, jigs, and fixtures, and even shorten your product development cycles through rapid prototyping. While commercially available 3D printers meet certain standards, your own project provides you with complete control and endless customization possibilities. For example, when you need to print a part of a specific size and specification for a unique production line, your self-built system will provide this flexibility.
The correct selection and integration of the electronic and mechanical components discussed in this guide will directly impact your printer’s performance, reliability, and longevity. To meet the high precision, repeatability, and durability standards required by an industrial environment, prioritizing quality over cost is critically important. Using V-slot wheels instead of linear rails might reduce costs in the short term, but it can increase maintenance requirements and compromise print quality in the long run. Similarly, a robust and stable power supply with advanced stepper motor drivers will ensure consistent performance and less downtime.
Detailed planning at the beginning of the project, clarifying the kinematic structure to be chosen (CoreXY, Cartesian, etc.), print volume, and types of filament to be used, will minimize problems that may arise later. Open-source software and communities (Marlin, Klipper, RepRap Forums) will provide invaluable support and information during this process. Remember that 3D printer technology is constantly evolving; therefore, staying abreast of the latest innovations and best practices will keep your system current and competitive. Building your own 3D printer is not just about owning a machine, but also a journey of learning and development that elevates your competencies in industrial automation. This investment will be a strategic step for your company’s future flexibility and innovation capacity.
FAQ
What type of frame is best for an industrial 3D printer, and why?
For industrial 3D printers, aluminum extrusion profiles (e.g., 2040, 4040) or steel frames are recommended due to their high rigidity and ability to minimize vibrations, which is crucial for print quality and stability. CoreXY or Cartesian configurations are commonly used.
Which linear motion systems are recommended for high-precision industrial 3D printing?
Industrial 3D printers benefit greatly from linear guide rails (MGN series) and blocks for X, Y, and Z-axis movement. These offer superior precision, durability, and load-bearing capacity compared to V-slot wheel systems, ensuring consistent and accurate motion with minimal backlash.
What kind of control board should I choose for an industrial-grade 3D printer?
A 32-bit processor control board supporting open-source firmware like Marlin or Klipper (e.g., SKR series, DuetWiFi, BTT Octopus) is ideal. These boards provide the necessary performance, flexibility, and expanded I/O ports to manage complex industrial 3D printing systems effectively.
What are the recommended stepper motors and drivers for an industrial 3D printer?
High-torque NEMA 17 stepper motors are generally preferred. For drivers, TMC2208, TMC2209, TMC2130, or TMC5160 are excellent choices, offering features like silent operation, microstepping, and sensorless homing, which enhance print quality and operational efficiency.
Why is an all-metal hotend important for industrial 3D printing?
An all-metal hotend is essential for industrial use, especially when working with high-temperature engineering filaments like ABS, Nylon, or PC. This design eliminates the risk of PTFE tube degradation at high temperatures, ensuring reliable and consistent extrusion.