No products in the cart.
Ball Screw Nut Bracket Mounting Techniques for Industrial CNC Systems

Contents
- Ball Screw Nut Housing (Nut Bracket) Mounting Techniques: Introduction and Technical Analysis
- Ball Screw Nut Bracket Mounting Techniques: Operating Principle and Technical Data
- Key Considerations for Ball Screw Nut Bracket Mounting Techniques in the Field
- Common Problems and Solutions in Ball Screw Nut Bracket Mounting
- Ball Screw Nut Bracket Mounting Techniques: Conclusion and Expert Advice
- FAQ
Ball Screw Nut Housing (Nut Bracket) Mounting Techniques: Introduction and Technical Analysis
At the heart of industrial automation systems, providing precise motion control, are linear motion systems, which are indispensable for modern manufacturing processes. A fundamental component of these systems is the ball screw nut housing, commonly known as a Nut Bracket. This critical mechanical element is used to securely and precisely attach the ball screw nut to the machine chassis or a moving platform. The correct selection and, more importantly, the proper mounting techniques for this component have a direct and significant impact on the overall system’s performance, accuracy, lifespan, and repeatability. Incorrect mounting can lead to vibrations, excessive wear, positioning errors, and even system failures, resulting in production losses and costly repairs. This field guide and technical article aims to provide a comprehensive and in-depth guide on ball screw nut bracket mounting techniques for engineers, technicians, and maintenance specialists working in the industrial automation sector. Our goal is to consolidate best practices, technical details, and field experiences to provide the knowledge necessary for your systems to operate at maximum efficiency. This article will detail not only the mounting steps but also pre-mounting preparations, potential problems, and their solutions. The role of the Nut Bracket is vital in CNC router machines, robotic arms, automation lines, and all types of linear motion applications requiring precise positioning, and therefore, every stage of its installation must be handled with meticulous care.
Ball Screw Nut Bracket Mounting Techniques: Operating Principle and Technical Data
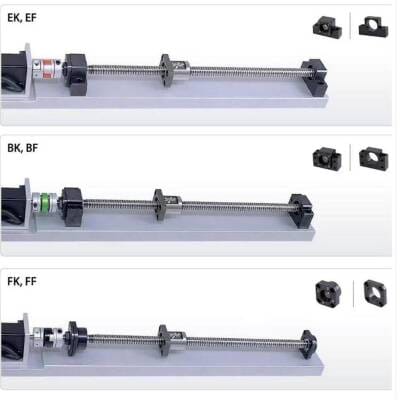
The ball screw nut housing (Nut Bracket) acts as an interface that integrates the connection between the ball screw and the nut into the main structure of the machine. Its fundamental operating principle is to enable the nut to perform linear motion by converting the rotational motion of the ball screw, ensuring the nut is firmly attached to a fixed or moving structure. This connection directly affects the system’s load-bearing capacity, rigidity, and consequently, its positioning accuracy. Nut brackets are typically manufactured from aluminum alloys, steel, or special composite materials and can have different mounting configurations: flange type, block type, or custom-designed integrated housings. The selection depends on factors such as the required load capacity, space constraints, environmental conditions (humidity, dust, temperature), and precision level of the application.
From an engineering perspective, one of the most critical factors to consider during the design and mounting of a Nut Bracket is alignment. Perfect alignment between the ball screw and the nut housing minimizes radial loads that can occur in the system. Radial loads cause the ball screw to bend, lead to premature wear of the nut and screw threads, increase friction, and ultimately reduce system efficiency. Therefore, using micron-level precision alignment tools and techniques during mounting is essential. Furthermore, the flatness and perpendicularity of the mounting surface are also critically important. Even the slightest curvature or perpendicularity error on the surface can lead to mounting stresses and deformation of the nut housing, negatively impacting system performance.
Nut brackets are typically used with preloaded nuts. Preloading eliminates backlash in the system, increasing positioning accuracy and repeatability. The Nut Bracket must rigidly support this preload and ensure that the preload is not compromised during mounting. The tightening torque of the mounting bolts, the tensile strength of the selected material, and vibration resistance must also be considered. Overtightening can damage the housing, while insufficient tightening can lead to loosening and vibrations.
Their application areas are quite extensive: they play a vital role in high-speed and high-precision CNC machining centers, 3D printers, laser cutting machines, lifting and positioning units in material handling systems, axes of robotic manipulators, and semiconductor manufacturing equipment, among many other industrial automation applications. Each application brings different requirements for the design and mounting of the Nut Bracket. For example, lighter materials with high dynamic rigidity are preferred for high-speed applications, while high-strength steel alloys are prominent in heavy-load applications.
| Parameter | Value/Description |
|---|---|
| Material Type | Typically Aluminum Alloy (light applications), Steel (high load/rigidity), Stainless Steel (corrosive environments) |
| Mounting Type | Flange (front/rear mounting), Block (top/side mounting), Custom Integrated Design |
| Precision Class | C0, C1, C3, C5 (according to ISO or JIS standards; backlash tolerance) |
| Application Area | CNC Machines, Robotics, Automation Lines, Measurement Devices, 3D Printers |
| Operating Temperature Range | Typically -20°C to +80°C (varies depending on material and lubricant) |
| Vibration Resistance | High (achieved with correct mounting and bolt selection) |
| Surface Treatment | Anodizing (Aluminum), Blackening/Nickel Plating (Steel) – for corrosion resistance |
Key Considerations for Ball Screw Nut Bracket Mounting Techniques in the Field
- Preparation and Inspection of the Mounting Surface: Before starting the installation, ensure that the surface where the Nut Bracket will be mounted (typically the machine chassis or carrier table) is absolutely clean, dry, and flat. Dust, dirt, oil, or metal chips on the surface can prevent the bracket from seating properly, leading to gaps and subsequent vibrations. The flatness of the surface should be checked using a dial indicator or precision gauges. Even deviations at the micron level can affect system accuracy. Additionally, ensure that the mounting holes are correctly positioned and sized.
- Selection and Torquing of Bolts and Fasteners: The quality and specifications of the bolts and washers used to secure the Nut Bracket are critically important. High-strength bolts (e.g., class 8.8 or 10.9) are generally preferred. The length of the bolts should be appropriate for the bracket thickness and the underlying structure, neither too short nor too long. Spring washers, lock washers, or chemical locking agents like Loctite can be used to prevent fasteners from loosening. Most importantly, the bolts must be tightened to the torque values specified by the manufacturer using a torque wrench. Overtorquing can damage the bolts or the bracket, while undertorquing leads to loosening and vibration. Tightening should be done in a cross-pattern and incrementally.
- Alignment and Parallelism Adjustment: This is one of the most critical steps in the mounting process. The central axes of the ball screw and the nut housing must be perfectly aligned. Additionally, the nut housing must be parallel to the axis of motion. Alignment errors create bending stresses on the ball screw, which shortens the life of the bearings and nut, increases friction, and reduces precision. Precision measuring devices (laser alignment systems, dial indicators, test mandrels) must be used for alignment. During mounting, the nut housing should be seated without any force or tension, allowing the ball screw to rotate freely. Using shims can assist in fine adjustments.
- Ball Screw and Nut Inspection: Before mounting, the ball screw and nut should be carefully inspected for any damage (dents, scratches, thread damage) or manufacturing defects. The runout of the screw should be tested with a dial indicator. The internal surfaces and threads of the nut must be clean and free of foreign matter. If necessary, they should be cleaned with an appropriate cleaner and lubricated with the manufacturer’s recommended lubricant. These pre-checks are vital to prevent performance issues that may arise after mounting.
- Vibration Control and Damping: In high-speed or dynamic load applications, vibrations can pose a significant problem. While rigid mounting of the Nut Bracket minimizes vibration, additional measures may be required in some cases. Vibration damping pads or specially designed fasteners can be used. It is important for the mounting surface to be sufficiently rigid and to avoid resonance frequencies. After mounting, it is advisable to operate the system to monitor vibration levels and make adjustments if necessary.
- Evaluation of Environmental Factors: Environmental factors such as ambient temperature, humidity, dust, contaminants, or chemical vapors can affect the performance and lifespan of the Nut Bracket and the entire system. These factors must be considered during mounting, and protective measures (sealing, coating, special materials) should be taken if necessary. For example, stainless steel or specially coated brackets should be preferred in high-humidity environments. Extreme temperature changes can cause thermal expansion, so material selection and clearance tolerances should be adjusted accordingly.

Common Problems and Solutions in Ball Screw Nut Bracket Mounting
Problems encountered in ball screw nut bracket mounting typically stem from incorrect installation, inadequate preparation, or improper component selection. One of the most common issues is premature wear and short lifespan. This usually results from alignment errors between the ball screw and the nut housing. Alignment errors create radial loads on the ball screw, applying abnormal stress to the nut and screw threads, which increases friction and accelerates wear. As a solution, during mounting, ensure that the ball screw and nut axes are aligned with micron precision using laser alignment devices or precise dial indicators. If necessary, use shims, and tighten the bolts incrementally, in a cross-pattern, and to the correct torque.
Another common issue is excessive noise and vibration in the system. This can often be caused by insufficiently torqued connecting bolts, lack of flatness on the mounting surface, or insufficient rigidity of the Nut Bracket. Noise and vibration can also originate from ball screw imbalance or bearing issues, but Nut Bracket mounting is also a significant factor. The solution is to check that all fasteners are tightened to the correct torque, ensure the flatness of the mounting surface, and use vibration damping pads if necessary. Additionally, operating the system at speeds close to resonance frequencies should be avoided.
Reduced positioning accuracy or repeatability issues are also a significant failure scenario. This is typically associated with increased backlash between the nut and screw, but it can also result from the Nut Bracket’s inability to provide sufficient rigidity in the system. Small looseness or deformations in the mounting can lead to unwanted play and positioning errors during motion. The solution is to select a Nut Bracket with high rigidity, periodically check the tightness of all connections, and if the nut is preloaded, ensure that the preload is maintained at the correct level. Furthermore, the mounting surface’s robustness and resistance to deformation are critically important.
Finally, problems such as loosening or breakage of mounting bolts can occur. This can be due to incorrect bolt selection (low strength), insufficient torquing, excessive vibration, or repetitive shock loads. The solution is to use bolts of the appropriate strength class, meticulously adhere to the manufacturer’s recommended torque values, and use bolt locking agents (e.g., Loctite) or lock washers. In applications with high vibration, special anti-vibration fasteners may be preferred. Regular maintenance checks of bolt tightness are a proactive step to prevent such problems.
Ball Screw Nut Bracket Mounting Techniques: Conclusion and Expert Advice
Ball screw nut bracket mounting techniques have a direct and decisive impact on the performance, accuracy, and lifespan of industrial automation systems. As detailed in this article, correct material selection, meticulous preparation of the mounting surface, tightening fasteners to the correct torque and sequence, and most importantly, perfect alignment, are the cornerstones of successful installation. Our field experience shows that these often-overlooked details can lead to serious operational problems and costly failures in the long run. It is not enough for a system to “just work”; the goal should be to operate at maximum efficiency, with minimum wear, and the highest precision. Achieving this goal requires diligence and professionalism in the mounting of critical mechanical components like the Nut Bracket.
As expert advice, while always strictly adhering to the manufacturer’s mounting instructions, it is essential to possess the necessary equipment and knowledge to perform critical checks (surface flatness, bolt torques, alignment) with micron precision, going beyond standard instructions. Investing in tools such as advanced laser alignment systems and precision torque wrenches is a step that pays for itself in the long run. Furthermore, keeping mounting personnel’s knowledge and skills up-to-date through regular training plays a key role in minimizing potential sources of error. It should be remembered that the lifespan and performance of a ball screw system are only as strong as its weakest link, and the mounting of the Nut Bracket is one of the most critical links in this chain. With a systematic approach, attention to detail, and a philosophy of continuous improvement, you can achieve the high performance and reliability you expect from your industrial automation systems. We hope this guide serves as a valuable resource for experts in the field.
FAQ
What is a ball screw nut bracket and what is its primary function?
A Nut Bracket (ball screw nut housing) is a mechanical component used in linear motion systems to securely and precisely attach the ball screw nut to the machine's frame or a moving platform. It ensures stable linear movement by converting the ball screw's rotational motion.
What are the most critical factors for successful Nut Bracket mounting?
Critical factors include precise alignment between the ball screw and nut housing, the flatness and perpendicularity of the mounting surface, correct selection and torquing of fasteners, and consideration of environmental factors like temperature and humidity.
What are common problems encountered during Nut Bracket mounting and how can they be resolved?
Common issues include premature wear due to misalignment, excessive noise and vibration from loose fasteners or uneven surfaces, and reduced positioning accuracy caused by insufficient rigidity or backlash. Solutions involve meticulous alignment, proper torquing, and using vibration damping measures.
How does proper Nut Bracket mounting affect the performance of an industrial CNC router machine?
Proper mounting directly impacts the system's load-bearing capacity, rigidity, positioning accuracy, and overall lifespan. Incorrect mounting can lead to increased friction, premature wear, and system failures, resulting in costly repairs and production losses.
What expert advice is recommended for optimal Nut Bracket installation and maintenance?
Always follow the manufacturer's instructions, use precision tools like laser alignment systems and torque wrenches, ensure mounting surfaces are clean and flat, and regularly train personnel. Proactive maintenance and systematic checks are crucial for long-term reliability.