
No products in the cart.
How to Adjust Stepper Motor Driver Current for Industrial CNC Applications

Contents
- Introduction and Technical Analysis Stepper motors, indispensable components in industrial automation, are widely utilized in robotics, CNC machines, 3D printers, medical devices, and numerous precision positioning applications due to their high accuracy, repeatability, and open-loop control advantages. One of the most critical factors directly impacting the performance of these motors is the correct adjustment of the current supplied by the motor driver. Incorrect current settings can lead to motor overheating, torque loss, step skipping, inefficient operation, and even permanent damage. Therefore, for industrial automation professionals, understanding how to adjust stepper motor driver current and performing this adjustment correctly is vital for the overall performance, reliability, and lifespan of the system. This detailed field guide and technical article will delve into the principles, practical methods, and critical considerations for adjusting stepper motor driver current. Our aim is to provide our readers with the necessary knowledge and tools to operate their systems most efficiently and reliably. Operating Principle and Technical Data
- Field Considerations for Stepper Motor Current Adjustment
- Common Issues and Solutions in Stepper Motor Systems
- Expert Advice
- FAQ
Introduction and Technical Analysis
Stepper motors, indispensable components in industrial automation, are widely utilized in robotics, CNC machines, 3D printers, medical devices, and numerous precision positioning applications due to their high accuracy, repeatability, and open-loop control advantages. One of the most critical factors directly impacting the performance of these motors is the correct adjustment of the current supplied by the motor driver. Incorrect current settings can lead to motor overheating, torque loss, step skipping, inefficient operation, and even permanent damage. Therefore, for industrial automation professionals, understanding how to adjust stepper motor driver current and performing this adjustment correctly is vital for the overall performance, reliability, and lifespan of the system. This detailed field guide and technical article will delve into the principles, practical methods, and critical considerations for adjusting stepper motor driver current. Our aim is to provide our readers with the necessary knowledge and tools to operate their systems most efficiently and reliably.
Operating Principle and Technical Data
Stepper motors are brushless DC motors that rotate the rotor at specific angles by sequentially and controllably supplying current to the stator coils. Each step occurs when the rotor locks into a specific position according to the direction of the magnetic field. To achieve this precise control, a stepper motor driver is required. The driver receives control signals (pulse and direction) and provides the appropriate current and voltage to the motor’s coils. Modern stepper motor drivers typically operate on the “chopper” principle; that is, instead of applying a constant voltage to the motor coils, they regulate the current by rapidly switching it on and off until the coil current reaches a specific reference value. This overcomes delays caused by the motor’s inductive nature and ensures the motor can produce sufficient torque even at high speeds. Furthermore, many drivers feature microstepping capability, which divides a full step into smaller sub-steps, allowing for smoother motion, higher resolution, and reduced resonance.
Adjusting the stepper motor driver current involves setting a level appropriate for the motor’s nominal phase current. The motor’s nominal phase current is the current value specified by the manufacturer at which the motor can operate continuously and safely. A current setting below this value can cause the motor to fail to produce sufficient torque and skip steps under load. Conversely, a current setting above the nominal value leads to excessive heating in the motor coils, degradation of insulation, and a shortened motor lifespan. Drivers typically have adjustable peak current or RMS current output. Most manufacturers recommend setting the driver current within the range of 70%-90% of the motor’s nominal RMS current. However, in high-speed applications or situations requiring maximum torque, this ratio can be increased up to 100%, but in such cases, additional cooling solutions must be considered.
Current adjustment methods vary depending on the driver model and type:
- Adjustment with Potentiometer (Trimpot): In older or simpler drivers, a small potentiometer (trimpot) is located on the driver board. This potentiometer typically adjusts the driver’s internal reference voltage (Vref). The driver’s output current is related to Vref by a specific ratio (e.g., I_out = Vref / R_sense, where R_sense might be the driver’s internal current sensing resistor). Users can adjust the current by measuring the Vref point with a multimeter and using the formula provided by the manufacturer. This method requires careful adjustment and measurement in situations demanding precision.
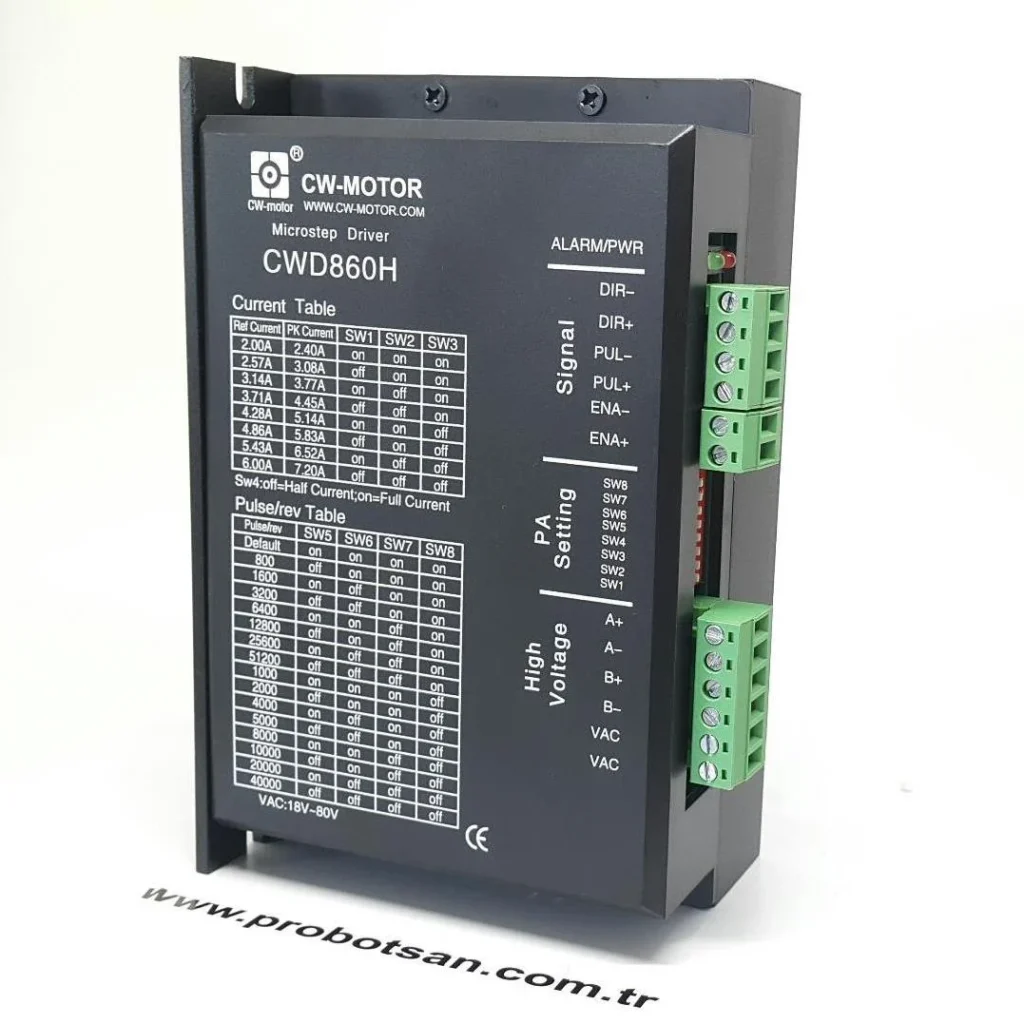
- Adjustment with DIP Switches: This is one of the most common methods. A series of DIP switches (usually 3 to 8) on the driver are used to select specific current values or microstepping settings. The driver’s or motor’s datasheet provides a table indicating the current values (or microstep ratios) corresponding to these switch combinations. The user employs this table to select the value closest to the motor’s nominal current. This method is fast and relatively easy but only offers predefined discrete current levels.
- Adjustment via Software and Communication Protocols (Modbus, EtherCAT, CANopen, etc.): In high-performance and industrial-grade drivers, current adjustment is typically performed via computer software or an HMI, through industrial communication protocols such as Modbus or EtherCAT. This method allows for much more precise and dynamic current adjustment. It can also offer advanced features like automatic current adjustment based on load conditions during operation (smart current control). Such drivers generally require more complex setup and configuration but provide superior flexibility and precision.
Regardless of the method used, the primary goal is to determine a current level that is appropriate for the motor’s nominal current but will not cause excessive heating. Additionally, at high speeds, the motor’s inductive reactance increases, extending the current rise time in the coils, which can lead to torque loss. To compensate for this, using a higher supply voltage can help maintain torque at high speeds by allowing the current to rise faster, but attention must be paid to the driver’s voltage tolerances.
| Parameter | Value/Description |
|---|---|
| Motor Type | 2-Phase Hybrid Stepper Motor (NEMA 17/23/34 etc.) |
| Phase Current (Nominal RMS) | 0.5A – 6.0A (Must be checked according to manufacturer datasheet value.) |
| Driver Current Adjustment Method | DIP Switch, Potentiometer (Vref), Software (Modbus/CANopen) |
| Driver Output Current (Max. Peak) | Set to 70%-100% of motor nominal current. |
| Driver Supply Voltage | 12VDC – 80VDC (Selected based on driver and motor compatibility.) |
| Operating Temperature Range (Motor) | -10°C to +50°C (Cooling may be required depending on ambient temperature.) |
| Microstep Resolution | From 1/1 to 1/256 (Selected based on application precision.) |
| Step Angle (Full Step) | 0.9° or 1.8° (Varies by motor model.) |
Field Considerations for Stepper Motor Current Adjustment
- Comprehensive Review of Motor Datasheet: First and foremost, the manufacturer’s datasheet for the stepper motor in use must be carefully examined. Values such as nominal phase current, phase resistance, phase inductance, and maximum operating temperature are critically important. The driver current is typically set between 70% and 100% of the nominal phase current. While higher current means more torque, it also generates more heat.
- Heat Control and Thermal Management: Even with correct current settings, the motor and driver will generate heat during operation. Excessive heating can lead to permanent demagnetization of the motor’s magnets, degradation of coil insulation, and the driver entering thermal protection mode, causing it to shut down. Therefore, after adjusting the current, the operating temperature of the motor and driver should be monitored. If necessary, passive heatsinks, active fans, or a lower current setting should be considered. The motor surface temperature should generally not exceed 60-70°C, but this value may vary depending on the motor’s class.
- Power Supply Voltage Selection and Impact: The supply voltage provided to the driver significantly affects the motor’s high-speed performance. A higher supply voltage (within the maximum voltage limits of the driver and motor) ensures that the current in the motor coils rises faster. This helps the motor maintain its torque, especially in high-speed applications. However, excessively high voltages can damage the driver. Establishing the correct balance between current setting and supply voltage is crucial for the system’s overall efficiency.
- Analysis of Load Conditions: The characteristics of the mechanical load the motor will operate under (inertia, friction, external forces) influence the current setting. Applications requiring continuous high torque may necessitate a higher current setting, while lighter loads can benefit from a lower current setting to save energy and extend motor life. Understanding the static and dynamic torque requirements of the application helps determine the optimal current level.
- Avoiding Resonance Frequencies and Microstepping: Stepper motors tend to resonate at certain speeds, which can cause vibration, noise, and step skipping. Microstepping is an effective way to mitigate these resonance effects. When current adjustment is used in conjunction with microstepping, it provides smoother motion and less vibration. Typically, 1/8 or 1/16 microstepping offers a good balance for most applications.
- Cabling and Connection Quality: The correct selection of power and signal cables between the motor and driver, as well as the quality of connections, affects the effectiveness of current adjustment. Undersized cables can lead to voltage drop and current loss, while poor connections can cause increased resistance and overheating. Using shielded cables and proper grounding reduces electrical noise, enhancing system stability.

Common Issues and Solutions in Stepper Motor Systems
Here are some common problems that may be encountered in stepper motor driver current adjustment or general stepper motor systems, along with suggested solutions:
- Motor Overheating:
- Problem: The motor becomes too hot to touch even under normal operating conditions, or the driver enters thermal protection.
- Solution: Reduce the current setting. Start with 70-80% of the motor’s nominal current and gradually increase it, ensuring it meets torque requirements. Improve thermal management by adding fans or heatsinks to the motor and driver. Check the ambient temperature.
- Motor Not Producing Torque or Skipping Steps:
- Problem: The motor cannot move under load, vibrates, or skips steps without reaching the desired position.
- Solution: Increase the current setting, but be careful not to exceed the motor’s nominal current. Try increasing the supply voltage within the driver and motor limits to improve torque at high speeds. Check if the mechanical load exceeds the motor’s capacity. Inspect cable connections between the motor and driver; loose or incorrect connections can cause torque loss.
- Torque Loss and Performance Drop at High Speeds:
- Problem: The motor operates well at low speeds, but its torque significantly drops at high speeds, leading to step skipping.
- Solution: Increase the supply voltage (paying attention to the driver’s maximum voltage limit). This ensures the coil current rises faster at high speeds. If the driver has high-speed performance modes, enable them. If the motor’s inductance is high, consider a motor with lower inductance or use a higher supply voltage.
- Motor Vibrates, Operates Noisily, or Enters Resonance:
- Problem: The motor vibrates excessively, makes abnormal noises, or encounters unexpected resonances at certain speeds.
- Solution: Increase the microstepping setting (e.g., from 1/4 to 1/8 or 1/16). This makes motor movement smoother and reduces resonance. If the driver has anti-resonance or vibration reduction features, enable them. Check for play or sources of vibration in the mechanical system. Ensure the stepper motor and driver are securely mounted.
- Driver Errors or Malfunctions:
- Problem: An error light illuminates on the driver, the motor does not move, or the driver is unresponsive.
- Solution: Carefully check all connections (power, motor, control signals). Ensure the supply voltage is correct and stable. Verify that motor phases are correctly connected to the driver (incorrect phase connection can damage the driver). Check if overcurrent or overvoltage protection has been triggered; in this case, reduce the current setting or check the voltage. Check for short circuits.
Expert Advice
Proper adjustment of stepper motor driver current is a fundamental requirement for industrial automation systems to operate with optimal performance, reliability, and longevity. This process is not limited to simply turning a potentiometer or setting DIP switches but requires a comprehensive engineering approach that encompasses the motor’s technical specifications, the driver’s capabilities, the mechanical load conditions of the application, and environmental factors. Our field experience demonstrates that this adjustment should be made through careful analysis and testing, not with a “plug-and-play” mentality. Always start by referencing the manufacturer’s datasheets for both the motor and driver, and apply the recommended initial current values. Then, carefully monitor the heat generated by the motor during operation and test whether it meets torque requirements. If necessary, gradually adjust the current to find the best balance. It should be noted that high torque is not always the best solution; excessive current shortens the life of the motor and driver while reducing energy efficiency. Considering factors such as microstepping, power supply voltage selection, and appropriate thermal management in conjunction with current adjustment will enhance the stability and precision of your system. This holistic approach will prevent many problems you might encounter in your automation projects, ensuring your systems operate smoothly and efficiently.
FAQ
What is the nominal phase current of a stepper motor?
The nominal phase current is the maximum continuous current a stepper motor can safely handle, as specified by the manufacturer in its datasheet. It's crucial for setting the driver current to prevent overheating or insufficient torque.
What are the risks of incorrect stepper motor driver current adjustment?
Incorrect current adjustment can lead to motor overheating, reduced lifespan, loss of torque, and step skipping. It can also cause the driver to enter thermal protection mode or even result in permanent damage to the motor or driver.
What are the common methods for adjusting stepper motor driver current?
Common methods include using DIP switches on the driver, adjusting a potentiometer (trimpot) for Vref, or utilizing software and industrial communication protocols (like Modbus or EtherCAT) for high-performance drivers.
How does microstepping affect stepper motor performance?
Microstepping divides a full step into smaller increments, resulting in smoother motion, reduced vibration, and higher positioning resolution. It also helps mitigate resonance issues that can occur at certain motor speeds.
What should I do if my stepper motor is overheating or skipping steps?
If your motor is overheating, first reduce the current setting to 70-80% of the nominal current. Ensure adequate thermal management with heatsinks or fans. If the motor is skipping steps or lacking torque, increase the current (without exceeding nominal) or increase the supply voltage within limits.